35 Tiny Garden Ideas to Transform Your Small Space into a Beautiful Oasis
Looking to turn that cramped balcony or tiny yard into a stunning retreat? Check out these 35 tiny garden ideas designed to transform your small space into a beautiful oasis. With a little creativity and some smart planning, you can create a lush and inviting environment that feels much bigger than it is.
From vertical gardens to container planting, these ideas not only maximize your space but also bring a splash of color and nature right to your doorstep. Whether you have a few square feet or just a window ledge, there’s something here for everyone to enjoy!
1. Embrace Vertical Gardening
Vertical gardening is a game-changer for tiny spaces. It maximizes your area while adding beauty and greenery. You don’t need a sprawling backyard to create a lush environment. Here are some ideas to get you started:
- Wall Planters: Use wall-mounted planters to add greenery without taking up floor space. Choose different sizes and shapes for visual interest.
- Hanging Gardens: Hang pots or baskets from ceilings, hooks, or railings. This adds depth and makes use of unused airspace.
- Trellises: Install trellises for climbing plants like peas or beans. They provide support and create a stunning backdrop.
- Shelving Units: Use shelves to stack pots. Mix herbs, flowers, and trailing plants for a vibrant display.
- Pallet Gardens: Repurpose wooden pallets as vertical planters. They’re easy to customize and can fit almost anywhere.
Benefits of Vertical Gardening
- Space-saving: Use vertical space to grow more plants in less area.
- Air Quality: Plants improve air quality, making your space healthier.
- Aesthetic Appeal: Vertical gardens create stunning visual displays that draw the eye.
- Easy Maintenance: Access your plants easily for watering and pruning.
Ideal Plants for Vertical Gardening
- Herbs: Basil, parsley, and mint thrive in vertical setups.
- Succulents: These low-maintenance plants add texture and color.
- Flowering Vines: Try morning glories or sweet peas for a splash of color.
- Foliage Plants: Ferns and pothos add lush greenery.
Vertical gardening not only enhances your space but also allows creativity. Mix and match plant types, colors, and textures for a truly unique look. With a bit of planning, you can turn any small area into a stunning vertical oasis.
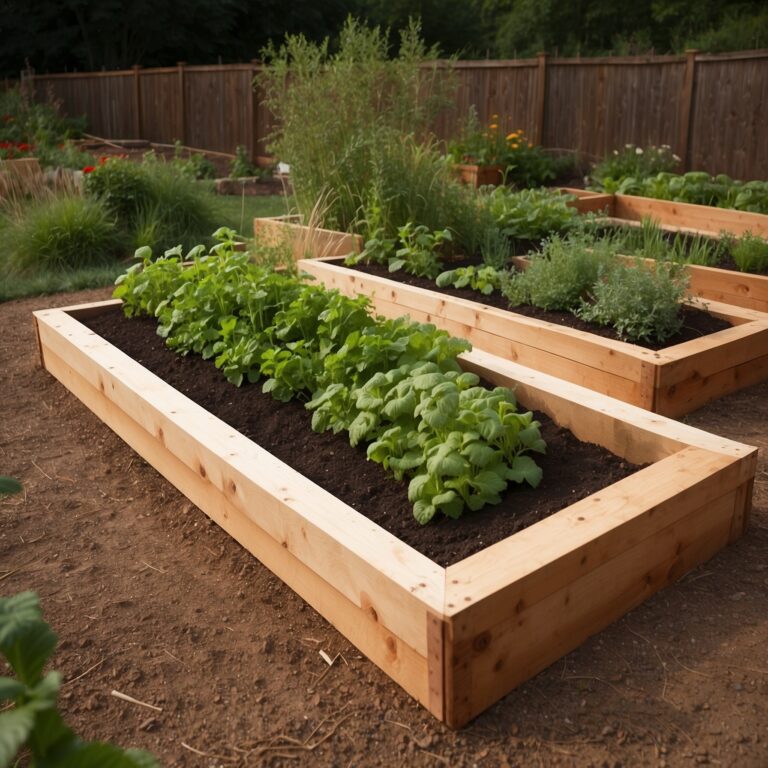
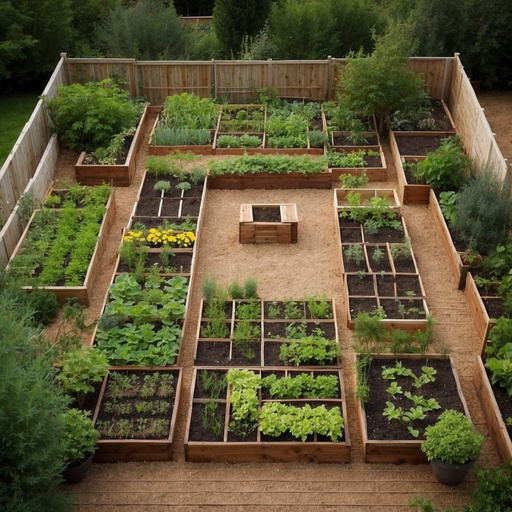
2. Container Gardening Essentials
Container gardening offers a fantastic way to create a lush oasis in a small space. Here are the essentials you need to get started:
Choosing the Right Containers
- Material: Consider clay, plastic, or metal. Clay allows for better airflow, while plastic is lightweight and easy to move.
- Size: Pick containers that match the plants’ growth. Small herbs need small pots, while larger plants require bigger ones.
- Drainage: Ensure your containers have drainage holes to prevent overwatering.
Soil and Fertilizer
- Potting Mix: Use a high-quality potting mix designed for container gardening. It retains moisture while providing good drainage.
- Fertilizer: Choose a slow-release fertilizer. Look for organic options to keep your garden eco-friendly.
Plant Selection
- Herbs: Basil, parsley, and mint thrive in containers and add flavor to your meals.
- Flowers: Petunias, marigolds, and geraniums bring vibrant colors and attract pollinators.
- Vegetables: Tomatoes, peppers, and lettuce can flourish in pots, offering fresh produce right at home.
Watering Tips
- Frequency: Check the soil moisture regularly. Water when the top inch feels dry.
- Technique: Water deeply and evenly. Avoid waterlogging by letting excess water drain out.
Sunlight Requirements
- Location: Place containers in areas that receive adequate sunlight. Most vegetables and flowers need at least 6 hours of sun daily.
- Rotation: Move containers as needed to optimize sunlight exposure throughout the day.
Additional Accessories
- Supports: Use stakes or cages for taller plants like tomatoes to keep them upright.
- Mulch: Add a layer of mulch on top of the soil to help retain moisture and suppress weeds.
Container gardening allows for creativity and flexibility. Mix and match plants, colors, and textures for a stunning mini garden. Enjoy the process and watch your small space transform into a beautiful oasis!
3. Create a Mini Herb Garden
A mini herb garden is a fantastic way to spice up your cooking and add greenery to your space. You don’t need a huge yard to grow fresh herbs. Here’s how to get started.
Choose Your Herbs
Pick herbs that you love and use often. Some popular choices include:
- Basil
- Mint
- Rosemary
- Parsley
- Thyme
Find the Right Containers
You can use various containers for your mini herb garden. Consider these options:
- Pots: Clay or ceramic pots work well. Ensure they have drainage holes.
- Vertical Gardens: Use wall-mounted planters to save space.
- Hanging Baskets: Great for herbs like trailing mint or oregano.
- Repurposed Items: Old teacups, tin cans, or wooden crates can add character.
Create the Perfect Setup
- Location: Choose a spot that gets at least 6 hours of sunlight daily. A sunny windowsill or balcony works great.
- Soil: Use well-draining potting soil. Look for mixes designed for container gardening.
- Watering: Keep the soil moist but not soggy. Water when the top inch of soil feels dry.
- Fertilizing: Use a balanced fertilizer every few weeks to keep your herbs healthy.
Maintenance Tips
- Prune Regularly: Trim your herbs to encourage bushy growth. Harvesting regularly prevents them from flowering too soon.
- Watch for Pests: Keep an eye out for pests. If you spot any, treat them with organic insecticidal soap.
- Rotate Plants: If you have multiple herbs, rotate them to ensure even sunlight exposure.
Enjoy Your Harvest
Once your herbs start growing, enjoy the fruits of your labor. Add fresh herbs to salads, pasta, or any dish that needs a flavor boost. Plus, nothing beats the satisfaction of using home-grown ingredients.
Creating a mini herb garden not only brightens up your space but also enhances your cooking experience. Dive into this green adventure and watch your culinary skills flourish!
4. Use Garden Trellises
Garden trellises add vertical space and visual interest to tiny gardens. They help you maximize your area while creating an inviting atmosphere. Here’s how to make the most of them:
- Choose the Right Material: Wooden, metal, or plastic trellises each offer unique benefits. Wooden trellises blend well with natural settings. Metal ones add a modern touch. Plastic options are lightweight and easy to move.
- Select Climbing Plants: Pick plants that thrive on trellises. Consider these options:
- Clematis: These hardy climbers produce beautiful flowers.
- Sweet Peas: They add color and fragrance to your space.
- Beans: Fast-growing and productive, perfect for edible gardens.
- Ivy: Great for a lush, green look.
- Positioning: Place trellises against walls, fences, or in corners. This setup saves ground space and creates a focal point. Ensure they receive adequate sunlight based on plant needs.
- Decorative Options: Get creative. Paint your trellis or choose a decorative design. Use fairy lights or hanging planters to enhance the aesthetic.
- Maintenance: Regularly check plants for growth. Prune as needed to keep them healthy and prevent overcrowding. Ensure the trellis remains stable and secure.
- DIY Ideas: If you’re handy, build your own trellis. Use reclaimed wood or bamboo for an eco-friendly touch. Simple A-frame designs or lattice structures can be both functional and attractive.
By incorporating trellises into your tiny garden, you create depth and charm. This simple addition transforms your small space into a beautiful oasis.
5. Incorporate Water Features
Adding a water feature to your tiny garden can elevate its charm and tranquility. You don’t need a large pond to create a soothing atmosphere. Here are some ideas to consider:
- Miniature Fountains: These come in various styles and sizes. A small tabletop fountain can fit perfectly on a patio or balcony. The gentle sound of flowing water creates a calming environment.
- Bird Baths: A bird bath attracts feathered friends and adds a delightful focal point. Choose a decorative style that complements your garden theme.
- Water Bowls: Use shallow bowls filled with water. Add floating plants or candles to enhance the aesthetic. This option is budget-friendly and easy to maintain.
- Wall-mounted Waterfalls: These save space and add visual interest. Install a small waterfall on your garden wall for a modern touch. The sound of water cascading down creates a peaceful ambiance.
- Pond in a Container: If you love the idea of a pond but lack space, consider a container pond. Use a large planter and fill it with water. Add aquatic plants and maybe some small fish for a lively touch.
Tips for Incorporating Water Features
- Choose the Right Location: Place your water feature where it gets some sunlight but also provides shade during the hottest part of the day. This helps maintain water temperature and keeps algae at bay.
- Consider Maintenance: Smaller features often require less upkeep. Ensure you can easily access the water for cleaning and refilling.
- Add Plants: Surround your water feature with plants. Choose native or drought-resistant species to create a harmonious blend with the water element.
- Lighting: Install soft lighting around your water feature. This adds a magical touch during the evening and highlights the beauty of the water.
- Sound Levels: Think about how loud you want your water feature to be. Fountains can be soothing, while a waterfall can be more pronounced. Adjust the flow to fit your preference.
Incorporating water features into your tiny garden transforms it into a serene oasis. The right choice adds beauty and attracts wildlife, creating a vibrant ecosystem in your small space.
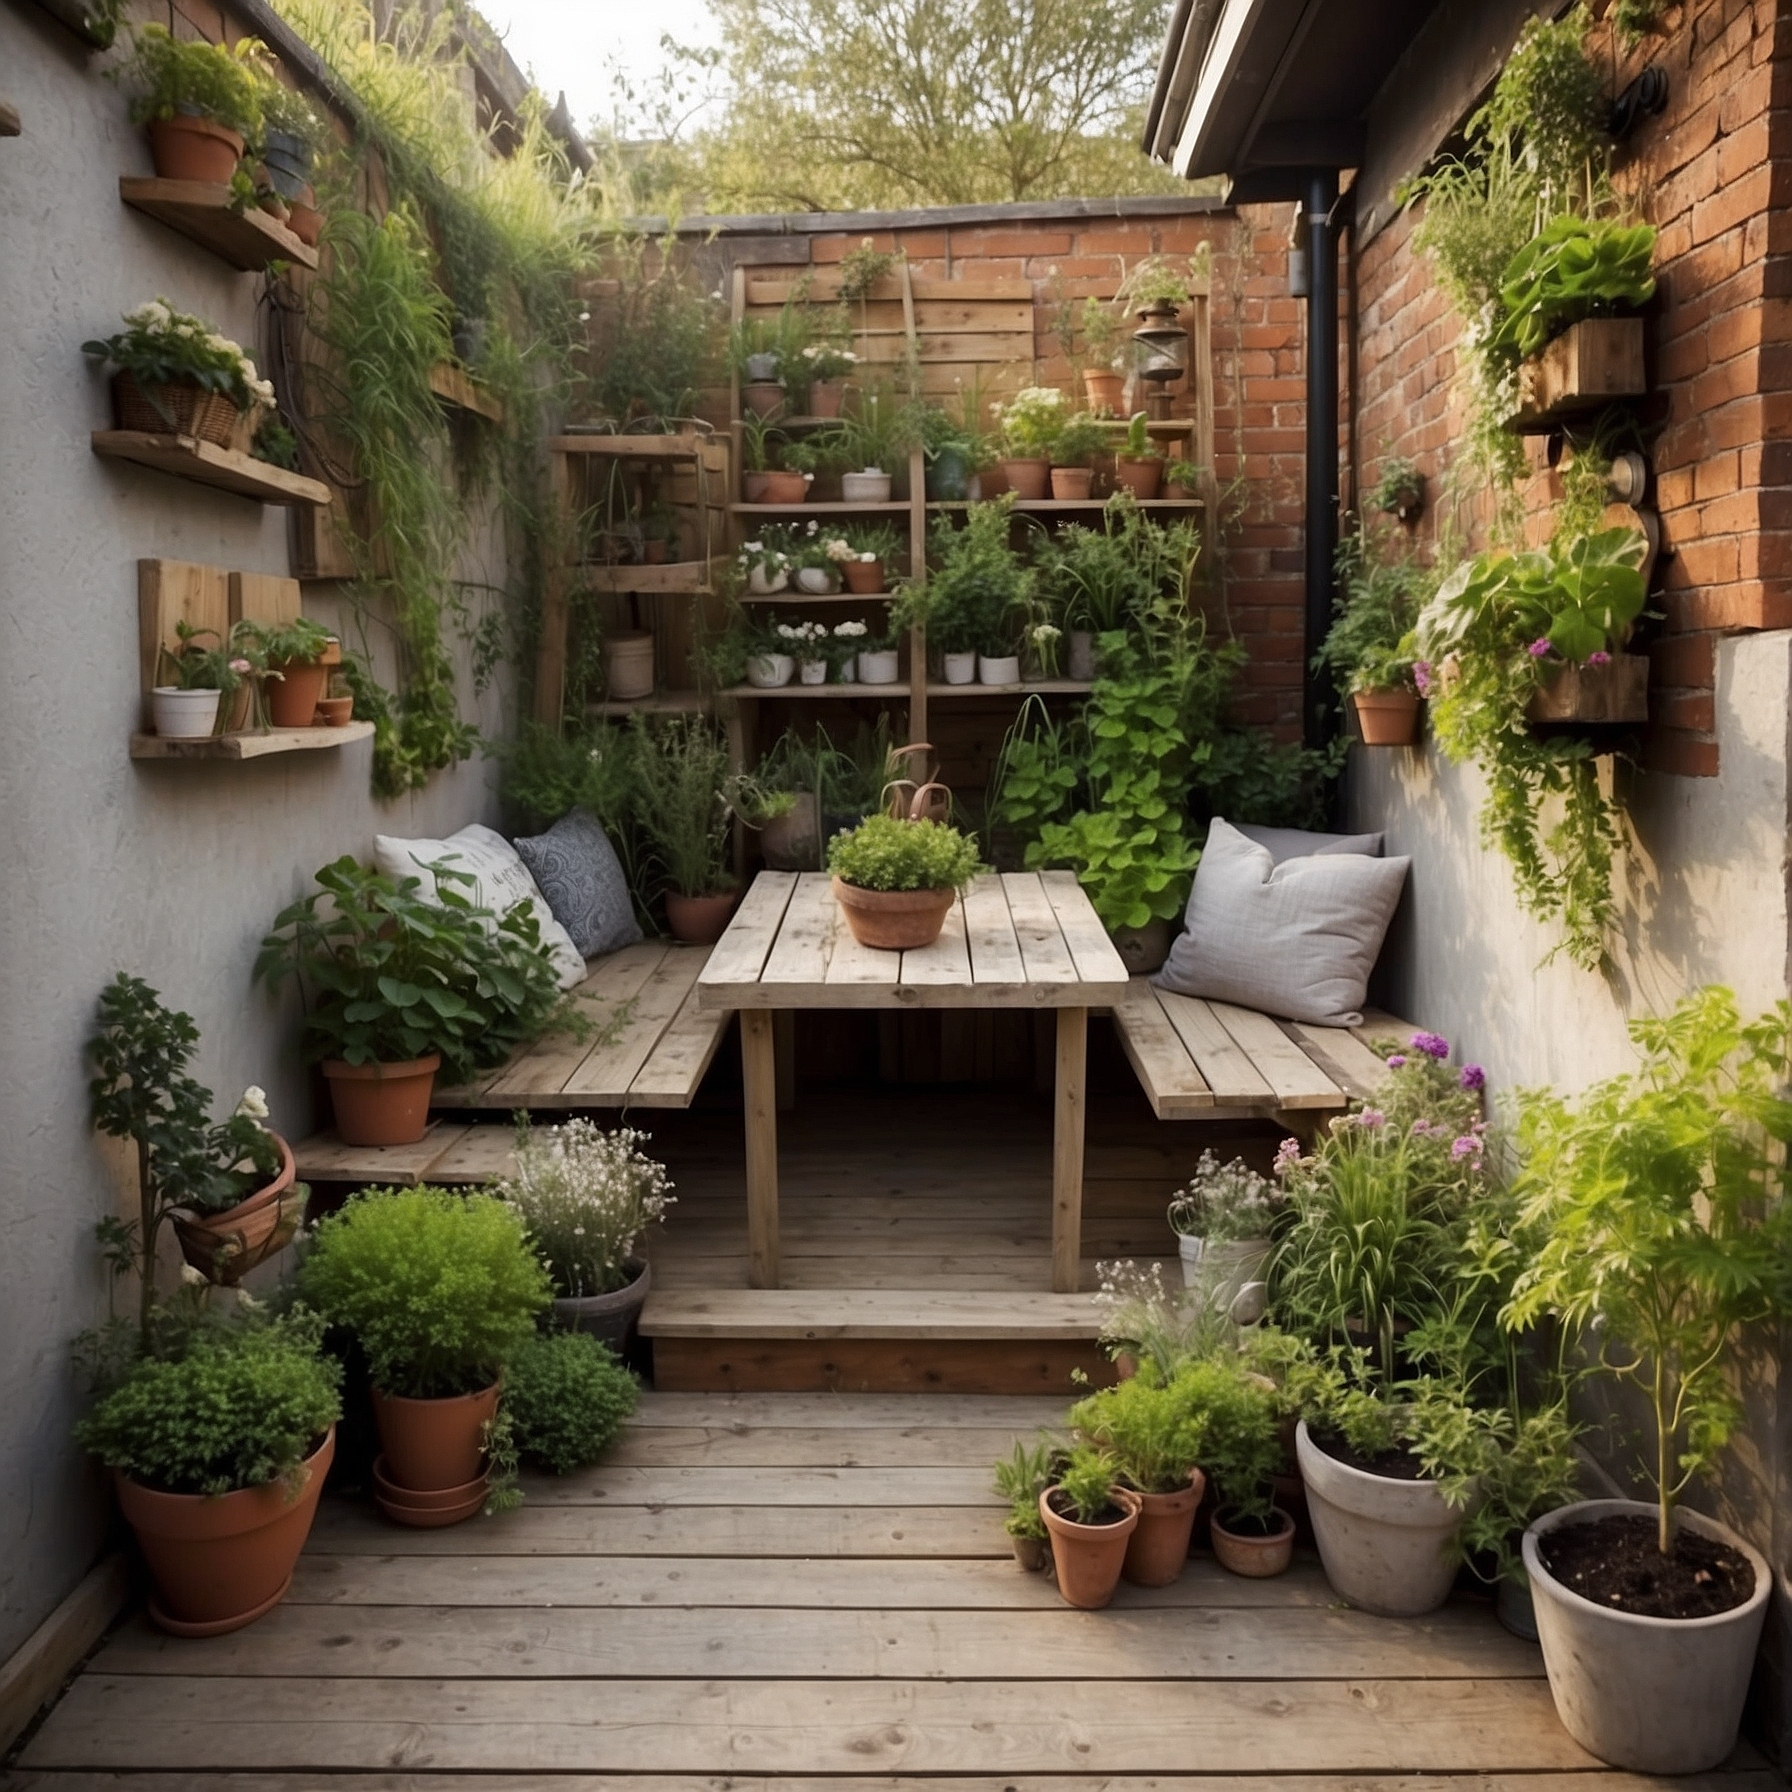
6. Design a Cozy Seating Area
Creating a cozy seating area in your tiny garden can make it feel like a personal oasis. Here’s how to do it without taking up too much space.
Choose the Right Furniture
- Compact Chairs: Look for foldable or stackable chairs. They save space and can easily be tucked away.
- Benches: A small bench can offer seating and storage. Choose one with a cushion for comfort.
- Pillows and Throws: Add colorful cushions and a soft throw to make the space inviting.
Create a Defined Space
- Rug: Use a small outdoor rug to create a cozy atmosphere. It visually defines your seating area.
- Planters: Surround your seating with potted plants. This adds privacy and a touch of nature.
- Lighting: Hang string lights or place lanterns around the area. Soft lighting creates a warm vibe.
Add Personal Touches
- Artwork: Use outdoor-friendly art or decor to express your style. A small sculpture or wall art can enhance the space.
- Table: Incorporate a small side table. Perfect for drinks or books, it adds functionality without crowding the area.
- Fire Pit: If space allows, consider a small tabletop fire pit. It brings warmth and a cozy atmosphere for evening gatherings.
Utilize Vertical Space
- Wall-Mounted Shelves: Install shelves to hold plants or decorative items. This frees up floor space and adds interest.
- Hanging Planters: Use hooks or brackets to hang planters. They draw the eye upward and create a lush look without taking up room.
Keep It Low Maintenance
- Choose Hardy Plants: Opt for low-maintenance plants that thrive in your climate. This keeps your oasis beautiful with minimal effort.
- Weather-Resistant Materials: Select furniture and decor made from materials like teak or metal. These withstand the elements and last longer.
A cozy seating area transforms your tiny garden into a perfect retreat. With a little creativity and the right elements, you can enjoy your outdoor space, no matter its size.
7. Choose Space-Saving Furniture
When you have a tiny garden, choosing the right furniture makes a huge difference. Opt for space-saving pieces that blend functionality with style. Here are some ideas to get you started:
- Foldable Furniture: Look for chairs and tables that fold away when not in use. This gives you extra space for gardening or lounging.
- Stackable Chairs: These chairs are perfect for small areas. You can stack them when you need more room or pull them out for guests.
- Nesting Tables: These tables tuck neatly into one another. Use one or all three depending on your needs, and free up space when they’re not in use.
- Benches with Storage: A bench doubles as seating and storage. Store garden tools, cushions, or toys inside, keeping your space tidy.
- Wall-Mounted Solutions: Shelves or tables mounted on walls save floor space. They also add a decorative touch with potted plants or decorative items.
- Ottomans with Hidden Space: Use ottomans that open up for storage. They provide extra seating and a place to stash items like blankets or magazines.
- Compact Bistro Sets: Perfect for small spaces, bistro sets fit snugly in corners. They create a cozy dining area without overwhelming your garden.
Tips for Choosing Space-Saving Furniture
- Material Matters: Lightweight materials make it easy to move furniture around. Consider aluminum, plastic, or wicker.
- Multi-Functional Pieces: Look for items that serve more than one purpose. A side table that can also hold a plant or a drink can be a game-changer.
- Color and Design: Go for lighter colors to create an illusion of more space. Sleek designs help avoid a cluttered look.
- Size Appropriately: Always measure your space before buying. Choose furniture that fits comfortably without overcrowding.
- Keep It Simple: Avoid overly ornate pieces. Simple designs provide a clean look and keep your garden feeling open.
With smart choices, you can create a beautiful oasis without sacrificing comfort or style. Transform that tiny garden into a welcoming retreat.
8. Add Color with Flower Pots
Flower pots can bring life to your tiny garden. They add color and charm, making your small space feel vibrant and inviting. Here’s how to make the most of flower pots in your garden:
- Choose the Right Size: Select pots that fit your space. Small pots work great on balconies, while larger ones can fill corners.
- Mix and Match: Combine different shapes, sizes, and colors. A mix of round, square, or hanging pots creates visual interest.
- Use Bright Colors: Go for bold colors like red, yellow, or blue. Bright pots can stand out against greenery and add a pop of fun.
- Create Groupings: Cluster pots together for a fuller look. Group them by height or color for a cohesive design.
- Vertical Gardening: Stack pots on shelves or hang them on walls. This saves space and adds depth to your garden.
Plant Selection
Choose plants that thrive in pots. Here are some great options:
- Succulents: Low maintenance and come in various shapes and colors.
- Herbs: Basil, mint, and rosemary add both beauty and practicality.
- Annual Flowers: Marigolds and petunias bloom all season long.
- Perennials: Consider lavender or hostas for longer-lasting color.
Care Tips
Keep your flower pots thriving with these simple care tips:
- Water Regularly: Pots dry out faster than ground soil. Check moisture levels often.
- Use Quality Soil: Good potting mix helps with drainage and nutrients.
- Fertilize: Feed your plants every few weeks to keep them strong and colorful.
- Deadhead Flowers: Remove spent blooms to encourage new growth.
Incorporating flower pots into your tiny garden creates a lively atmosphere. With careful selection and arrangement, you can turn any small space into a beautiful oasis.
9. Incorporate Edible Plants
Transform your tiny garden into a functional oasis by incorporating edible plants. Not only do they beautify your space, but they also provide fresh produce right at your fingertips. Here are some ideas to get you started:
- Herbs: Perfect for small spaces. Basil, mint, and parsley thrive in pots. Place them on windowsills or hang them in vertical planters.
- Salad Greens: Lettuce, spinach, and arugula grow quickly and require minimal space. Use shallow containers or raised beds to maximize your yield.
- Cherry Tomatoes: These little gems do well in containers. Choose compact varieties that don’t need much room. A trellis can save space while adding vertical interest.
- Peppers: Bell peppers and hot peppers adapt well to pots. They love sunny spots and can add a pop of color to your garden.
- Radishes: Fast-growing and space-efficient, radishes can be planted in small patches. They’re perfect for quick harvests.
- Strawberries: These can thrive in hanging baskets or vertical setups. They add sweetness and charm to your garden.
- Compact Fruit Trees: Look for dwarf varieties that fit in small spaces. They can produce delicious fruits while acting as a focal point in your garden.
- Microgreens: Ideal for small spaces. You can grow them indoors or outdoors in a shallow tray. They sprout quickly and are packed with nutrients.
- Edible Flowers: Nasturtiums and pansies not only brighten your space but also add flavor to salads. Grow them alongside your herbs and veggies for an eye-catching mix.
Start small and gradually expand your edible garden. Mix and match different plants for a colorful and productive space. Enjoy the process of growing your own food while creating a beautiful retreat in your tiny garden.
10. Use Decorative Gravel Paths
Gravel paths add charm and functionality to your tiny garden. They guide visitors through your space while enhancing the overall look. Here’s how to make the most of gravel paths in your small oasis.
Benefits of Gravel Paths
- Easy Installation: You don’t need heavy machinery or professional help. Just lay down the gravel over a weed barrier.
- Low Maintenance: Gravel requires minimal upkeep. Just rake it occasionally to keep it looking fresh.
- Versatile Design: Gravel comes in various colors and sizes. Mix and match to fit your garden’s style.
Tips for Creating Gravel Paths
- Plan Your Layout: Decide where you want your paths. Use a garden hose to outline the shape before digging.
- Choose the Right Gravel: Look for decorative gravel that complements your plants and decor.
- Edge Your Path: Use bricks, stones, or wood to create a border. This keeps the gravel contained and adds a polished look.
- Layer Properly: Start with a base layer of larger stones, then add finer gravel on top. This prevents sinking and maintains stability.
- Consider Drainage: Ensure your paths slope slightly away from any structures. This helps with water runoff and keeps your garden dry.
Creative Ideas for Using Gravel Paths
- Curved Paths: Instead of straight lines, try gentle curves to create a more natural flow.
- Mix Materials: Combine gravel with stepping stones for a unique look. This adds texture and breaks up the space.
- Incorporate Plants: Line your gravel path with low-growing plants or flowers to soften the edges. This adds color and draws the eye.
- Add Lighting: Install solar lights along the path. This enhances safety and creates a magical atmosphere in the evening.
Gravel paths not only beautify your tiny garden but also make it more functional. They invite exploration and create a welcoming vibe. So grab some gravel and start designing your perfect path today!
Conclusion
Tiny gardens offer endless possibilities for creativity and relaxation. You can design a space that reflects your personality and enhances your outdoor experience. Use vertical gardens, container plants, and creative layouts to maximize your small area. Embrace the challenge of limited space and let your imagination run wild.
Transforming your small space into a beautiful oasis is within reach. With the right plants and thoughtful design, you can create a stunning garden that brings joy and tranquility. Dive into your gardening journey and watch your tiny oasis flourish.